I love building tables. There is something so cathartic about cutting wood and melding it together in a way that makes it beautiful. Then there are those tables where the math makes me crazy and I question the very existence of tables. Angles, lines, diameter, convergence. Not in my wheelhouse. So I did the only logical thing I could do. I walked away from the frustration and talked my husband into dealing with the math.
It all started when I came across this blog post I found on Pinterest. I loved the table base and I wanted it for my kitchen table. After remodeling our kitchen I wanted a slightly smaller table than the one we currently have. The blogger built a smaller table than what I wanted and so the angles had to be changed to accommodate the larger size I wanted. Hence my frustration over the math.
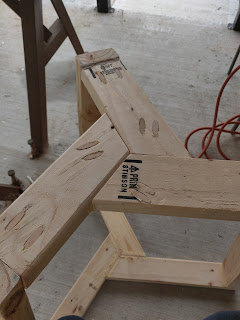
But my wonderful hero-husband figured it all out, after several attempts and a lot of frustration of his own. We used untreated pine 2x4's we picked up from Lowe's.
Isn't it a lovely shape?
Now, it was up to me to beautify these pine boards. That started with filling in the screw holes and any gaps or scratches. It took several applications and a couple of different types of wood filler to do that but eventually, they were all filled.
I wanted to test it out with the top.
After several days of filling and sanding and filling and sanding again, the base was ready for staining. I went back and forth about stain or paint and in the end, I did both to get a slightly weathered look on the base.
If you look close you can see some of the gray paint peeking through the stain.
Now it was time to tackle the tabletop. I opted to buy a
premade 36" round top from Lowe's about six months ago before lumber prices blew through the roof. It was under $40 back then and now it's over $50. I'm glad I got it when I did because I doubt I would have spent the money now. I gave it a light scuff sand and started staining. This color is Voodoo Gel Stain in
Tobacco Road by Dixie Belle. I am in love with this color. It is a rich brown without the red undertones found in so many brown stains. It's also water-based with no odor, making it not only a breeze to clean up but I can stain in the house where it is more comfortable for me.
This is just one coat and it covered beautifully.
I let that sit for two days just to make sure I wanted to leave it with just one coat and then I applied a coat of Mixwax Polycrylic in Clear Satin. I did a light sanding in between coats and in the end I put a total of six coats of polycrylic. This is probably overkill, but it will be used every day, multiple times a day and I wanted that finish to be indestructible.
I have it off in a corner of the living room to cure.
Now, you're probably asking yourself, "Self, what is this family going to sit on while using this table?" Well, I'll answer that for you. I had wanted these chairs from Wayfair, but they were always out of stock. I watched them for a year and they were never in stock in the natural wood legs and navy plaid fabric.
Over the Summer, on one of our usual weekly trips to Goodwill, my husband and I found four of these chairs.
They are simply adorable and the fabric was still wrapped in the original protective plastic wrap. The plaid color matches perfectly with my window valances in the breakfast nook. I'm going to paint the chair base in my favorite white - Sawmill Gravy and add a touch of brown wax to the flower detailing on the back of the chairs. I just have to be patient until my paint gets here next week. Three of these chairs will sit around our new kitchen table and the fourth will be used at my bathroom vanity.
Once the paint arrives and I refinish the chairs I'll post an updated picture of the complete set.


Comments
Post a Comment